Introduction
The Collaboration Hub is a portable accessory that accepts video and audio from various video sources and links it to the application running on a Smartphone or Tablet (iOS or Android).
Using the Hub, technicians can share video and audio from external video sources for real-time collaboration with remote experts.The Hub supports the following inputs:
- HDMI: up to 1080p30
- USB 2.0: USB Video Class (UVC) v1.1 or higher compliant devices
- USB 2.0: USB Audio Class (UAC) for basic audio devices v1.0
- VGA (up to XGA: 1024x768@70 Hz)
- S-Video: NTSC and PAL
- Composite Video (using an S-Video Adapter)
This manual describes the Hub and how to use it with Smartphones and Tablets.
TopRequirements for Use
- Collaboration Hub
- Hub external battery charger
- Application software
- iOS or Android Smartphone
- Apple Lightning to USB Cable
- Android Smartphone USB Cable
Ports & Indicators
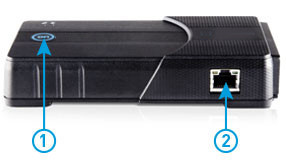 | 1. Power and Stream Status Indicator
Blue: Hub is streaming media. Flashes White: Hub is updating firmware.
|
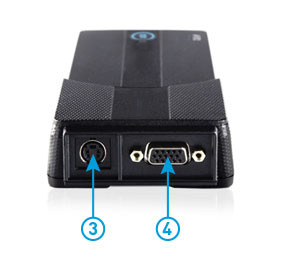 | 3. S-Video Media Input
|
 | 5. USB Media Input
|
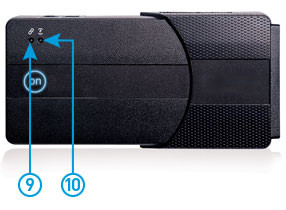 | 9. Link Indicator
Pulses Red when Hub is updating firmware.
Green: fully charged Orange: charging Red: charger fault occurred Battery capacity without power adapter connected: Green: over 40% Orange: 20%-40% Red: 10%-20% Flashing Red: less than 10% Auto Shutdown: 4% |

|
11. USB Device Port
|
Top
Setup and Use
Internal Battery
The internal battery makes the Hub a portable solution. A fully charged battery supports 4 to 5 hours of streaming when using the High Media Configuration (720x480, 10 fps). Battery Life may vary depending on the selected Media configuration.
Before using your Hub, connect the power adapter to the Power Port and allow the battery to fully charge. When the Hub is powered off, charging will take approximately 4 hours. The battery will also charge if the Hub is powered on but at a slower rate.
Charge Status:
- Orange: battery is charging.
- Green: battery is fully charged.
You can also operate the Hub while it is plugged into the power adapter.
Power Button and Status Indicator
Press the Power Button for one second to turn on the Hub.
- The status indicator glows solid White when the Hub is On.
- The status indicator glows solid Blue to show that the Hub video is being streamed by the application.
- The status indicator flashes White when the Hub firmware is being updated by the application.
- When the Status Indicator is off, the Hub is off.
Turn off the Hub by pressing the Power Button. When running on battery, the Hub automatically powers off after 5 minutes of inactivity.
To perform a manual reset of the Hub, press the power button for 10 seconds.
Connecting to a Smartphone
- Using a USB cable, connect the Hub to a Smartphone.
- Turn on the Hub by pressing the Power Button. The Smartphone will automatically pair to the Hub. If the application is not already running, you will be prompted to allow the application to launch automatically.
- Select Allow to launch the application immediately.
- Select Ignore to prevent the application from launching immediately. Start the applicaton when needed by clicking on the app's icon.
- From the Dashboard you can check the status of the Hub by pressing the System Health button.
- If a Hub is not attached, the Accessory will show Not Present.
- The System Health screen will also show the Hub as Not Present if it is powered off while attached to a Smartphone.
- If a Hub is connected, the System Health screen shows the Accessory as "Connected". Press "Details" and scroll to the Hub Details section to view the battery status and firmware version. The Link Indicator on the Hub turns green to show a successful connection to the application.
- View the System Health-Details screen at any time to check the battery level and to decide when the battery requires charging. The Charge Indicator on the Hub turns red when the battery discharges to 20%; this is an indication that charging is required.
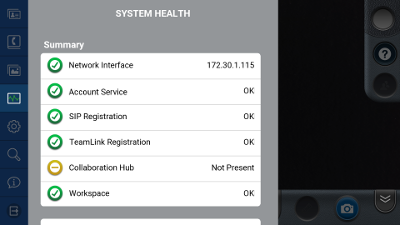
Figure 4.1 System Health (not connected)

Figure 4.2 System Health (connected)
Updating the Firmware
You can check for updates by going to Settings-Collboration Hub. Press "Check for Updates".
- If an update is available follow the onscreen instructions. Note: The Hub must be plugged into the power adapter to proceed with an update.
- If the Hub firmware is up to date press "Close".
Powering a Smartphone
When the Hub is running on internal battery, it does not provide power to the connected Smartphone. That means the Hub will not charge the internal battery of a connected Smartphone.
However, the Hub will provide power to a Smartphone under the following conditions:
- The Hub is plugged into the power adapter (not running on internal battery).
- The Hub is powered on.
Under the above conditions, the Hub can charge the internal battery of a Smartphone.
Hub Video: Viewing and Streaming
The External Video Source icon appears at the top right of the Viewer whenever the Hub is successfully paired with the application.
When connected, video that is captured by the Hub is automatically displayed in the Viewer. The video can then be shared in a call (and/or recorded).
If the Hub does not have an active external video source connected, the No Signal message appears in the Viewer (see the Hub Media Sources section for instructions on connecting external video sources).
During a call, shared video can be switched between Front, Back and External Video Sources. To select the Hub as a Video Source, choose External from the Video Source list. The other video source options refer to the front or back camera of a Smartphone.
Whenever the Hub is disconnected from a Smartphone, the application will automatically switch back to an internal camera of the Smartphone as the video source.
Hub Media Sources
Video Source Selection
The Hub supports multiple video inputs which may be simultaneously connected to the Hub. However, only one video input will be active at a time. The order of video source selection is as follows:
- HDMI (unprotected sources only, non-HDCP)
- USB video class devices (UVC USB Video Class v1.1 or higher compliant)
- USB audio class devices (UAC for basic audio devices v1.0)
- VGA (up to XGA: 1024x768 @ 70 Hz)
- S-Video (NTSC and PAL)
- Composite Video using an S-Video Adapter (NTSC and PAL)
If the active source is removed from the Hub, it searches for the next available source and selects it automatically.
The video source devices can be hot swapped. It is not necessary to stop streaming before connecting or disconnecting any video source.
Audio Source Selection
In addition to video, the Hub streams subject audio if it is available. Subject audio is synchronized with the active video stream. The availability of subject audio is summarized below for each media input:
- HDMI Media Input HDMI supports both video and audio so subject audio is available from HDMI sources that transmit audio.
- USB Media Input This input can simultaneously support video and audio endpoints. Subject audio is available from USB cameras that support it. Note Some USB audio devices have non-standard interfaces and may not be compatible with the Hub.
- S-Video and VGA Media Inputs: These video sources do not carry audio signals and therefore do not support subject audio.
NOTE: Any video source can be augmented with subject audio by connecting a supported USB audio device to the Hub. The USB media input captures audio when another media input is selected as the video source. USB audio takes precedence and replaces HDMI audio if HDMI is the selected source.
Changing Stream Settings
The user may select video stream settings using the Audio/Video Settings screen. However the inputs available to the Hub can vary in available resolutions, aspect ratio, and frame-rate. For this reason the Hub automatically adjusts the settings to remain consistent with the capabilities of the active video source.
For example: If the user selects D1 (720x480) at 30 frames per second (FPS) and the Hub is connected to a USB camera that provides a maximum of 640x480 @ 10 FPS, then the settings are adjusted to 640x480, 10 FPS. If the user then unplugs the USB camera and attaches an HDMI source of 1080p30, the Hub re-adjusts the settings to 720x400, 30 FPS. The 720x400 resolution matches the HDMI aspect ratio of 16:9 while not exceeding the original requested frame size.
Video Specification
The Hub supports multiple video inputs which may be simultaneously connected to the Hub. However, only one video input will be active at a time. The order of video source selection is as follows:
- HDMI (unprotected sources only, non-HDCP): up to 1080p30
- USB 2.0: USB Video Class (UVC) v1.1 or higher compliant devices
- USB 2.0: USB Audio Class (UAC) for basic audio devices v1.0
- VGA (up to XGA: 1024x768@70 Hz)
- S-Video: NTSC and PAL
- Composite Video (using an S-Video Adapter)
Media Configuration
- The Audio/Video status panel displays the current media configuration when streamin video.
- Media Configurations range from Low (320x240) up to 1080p. When a Media Configuration is selected, the Hub will provide H.264 video at the closest matching resolution the video source supports. In most cases the resolution of the video sent by the Hub will match the resolution of the selected Media Configuration.
- The Hub may produce video at slightly different resolutions than set in the Media Configuration to ensure the aspect ratio is correct. The actual resolution of the video being streamed will be displayed at the top of the Audio/Video status panel.
- To achieve the best quality images when sharing HD Video in a call, set the output resolution of the video source attached to the Hub to match the Media Configuration being used.
- For example, if the selected Media Configuration is streaming 720p video then set the output resolution of the video source attached to the Hub to 720p as well. Note: When making changes to the video source, most cameras change their output resolution immediately; however some cameras may require the cable to be re-connected to the Hub after the resolution is changed.
- Again when using High Definition resolutions: it is best practice to always match the resolution of the Media Configuration to the resolution of the native video source attached to the Hub. If the resolution is not matched the Hub must resize each video frame, this can cause excessive overhead at higher frame rates and may introduce latency into the stream.
Top
Troubleshooting
The following section describes possible issues and how to resolve them.
Application Not Pairing with the Hub
Symptoms
The Hub does not have the link indicator led lit or the application does not show the External Video icon in the Viewer and the System Health screen reports that the ub is Not Present.
Issue
The possible issues are the Hub is not physically connected to a Smartphone, the Hub is off or the internal battery is not charged, or the cable connecting the smartphone to the hub is faulty.
Solution
- Connect the Hub to the Smartphone using the appropriate USB cable.
- Make sure the Hub is being powered by the power adapter.
- Press and hold the power button for 1 second to turn on the Hub and wait for the status indicator to turn white.
- Confirm that the application recognizes the Hub. If the Hub is not recognized and the link indicator led is not green, try another cable to confirm the cable is not faulty.
Hub Shows No Signal
Symptoms
The Hub has been selected as the video source and one or more of the media inputs are connected but the Viewer shows No Signal.
Possible Issue
None of the connected media inputs is active or valid.
Solution
- USB
Unplug and reconnect the USB camera. Some USB cameras can take up to 10 seconds to start sending video. If no video appears then it is possible that the particular device is not supported by the Hub. If this is the case please contact Librestream Support.
- HDMI
Unplug and reconnect the HDMI cable. If no video appears then it is possible that the HDMI source is protected using HDCP. Examples of HDMI devices that are protected are DVD/Blueray players, satellite receivers, Apple TV or similar boxes.
- VGA
Unplug and reconnect the VGA cable. If no video appears then the VGA source may be configured to output an unsupported resolution or refresh rate (maximum is 1024x768 at 70 Hz).
- S-Video
Confirm that the S-Video source is on and configured to output video.
Video from Hub is Rolling or Distorted
Symptoms
The video from the Hub that appears on the Viewer is rolling or distorted.
Issue
Some video sources or the intervening cables may supply weak or noisy signals to the Hub causing poor initial synchronization.
Solution 1
Disconnect and reconnect the video source.
Solution 2
Select a video source other than the Hub (e.g. Front or Back camera) and then reselect the Hub.
Hub is Non-responsive
Symptom
The Hub appears to be powered on (some or all indicators are lit) but will not connect to a Smartphone and will not power off.
Solution
- Disconnect the Hub from the Smartphone.
- Make sure the Hub is connected to the power adapter.
- Press and hold the Power Button for 10 seconds to reset the Hub.
- Power the Hub back on and reconnect to the Smartphone.
Other Issues
If your issue is not listed then follow the steps in the Hub is Non-responsive section. If this does not resolve your issue, please contact support@librestream.com.
Top